CD Digitize Guide
Digitizing Your Music Collection
Table of Contents
Requirements:
- A CD
- A Disc Drive
- A Slight Case of OCD
- A Heaping Dose of Dedication
Preparations
Snag a few CD's you want to digitize first, and make space for 4 piles. They will all start in the first pile, and as we progress through the process they will move onto the next. Let's get these things moving!
First let's set up your file organization. I have a base folder just titled "CD Rips". Inside this I have:
- ! Album Covers - (For keeping album covers easily accessible)
- ! Fixes - (For when freac has an error. More on this later)
- ! Others - (Digital music you own)

PILE 1 - Album Art
Head to https://covers.musichoarders.xyz/
(Note: For this demonstration, I will use AC/DC's "Back in Black")You'll see a bunch of different music websites at the top that the website can pull album covers from, but you can only have 9 active at once. I recommend using:
- Main 4:
- Amazon Music (High quality)
- Apple Music (High quality)
- Bandcamp (Indie)
- Discogs (Everything Else)
- Backup 5:
- iTunes
- Last.fm
- Soulseek
- SoundCloud
- Spotify
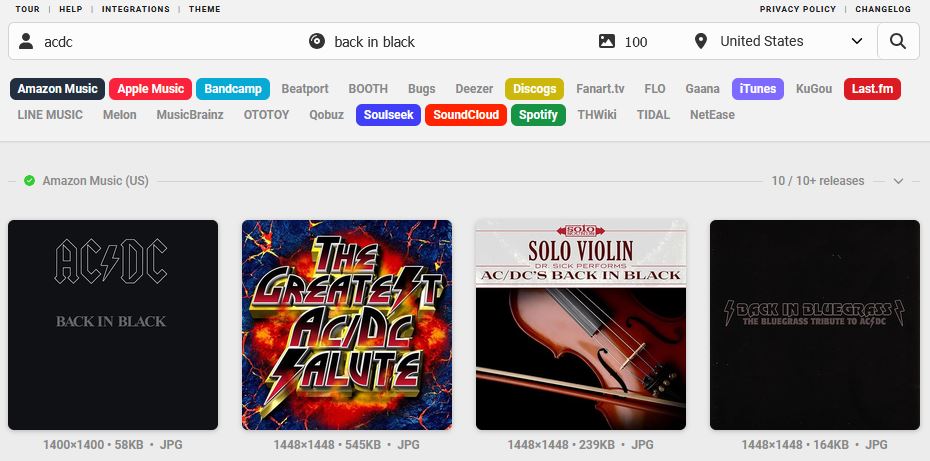
You might need to try rewording the album name if it isn't explicit on the cd.
I try to get one around 1000x1000, and no bigger than around 1500x1500, but smaller is fine.
You don't want the file size to be massive, and the image will be small on your iPod screen anyway. That first option is perfect for what we want.
Click on it, and drag the full-sized version over to your "! Album Covers" folder.
 You can now move the CD into Pile 2!
PILE 2 - Digitizing
We're going to start by downloading the two necessary software to rip:
- fre:ac - The main software you'll use to rip. Much faster and more user friendly.
- EAC - A backup, more accurate ripper if you get an error message for any tracks on freac.
Initial Ripping With freac
- 1. Open up freac and insert your CD
- 2. Make sure it's set to .flac

- 3. If your CD didn't auto-populate, hit this button:

A dropdown should appear with the artist and album. There will most likely be a few options that all look the same. This info was all added by other users into a database, so if even one piece of metadata is different, it creates a new version. I usually just look for one has the correct capitalization and choose that. For example:
"Party In The USA" ❌
"Party in the USA" ✅
You can edit everything yourself anyway. It should populate with most of the correct info, but you might need to edit a few things. Once again, the entries here were submitted by random people who have ripped the same CD, so the more niche the album is, the more likely you'll have to edit things.
I've even found a few CD's where more than one song name was spelled incorrectly, so definitely give a quick scan to make sure everything looks right. It will most likely come with the artist, album name, and song titles, but I always make sure to add the album art, genre, and year if they aren't already there. Make sure to add the Disc # if it's a multi-disc release.
Then just click the green play button and let 'er rip!

💡 Pro Tip
While you're waiting, you can get the album covers for your other CD's!
If you didn't encounter errors, you can now move the CD into Pile 3!
Error Correction With EAC
(Note: This section is only relevant if you encountered any errors after ripping [example below]. If your CD ripped correctly, skip to
PILE 3 - Cataloging)

This takes a bit more to set up, I recommend following this guide.
In General, I checked "Beep after extraction finished". It's nice knowing when it finishes if you happen to be across the room or working on something else while goes.
Once you reach the Directories section, you're going to direct it to your "! Fixes" folder.
In the External Compression section, copying from the website into the EAC box has the wrong quotation marks (as mentioned by the author), so I redid it for you to copy here:
There's also no freedb tab (I think the guide might be outdated), so I didn't change anything in the "AccurateRip meta" tab which is what shows for me.
Now that it's set up, you're going to uncheck all and then just select the tracks that gave you an error.
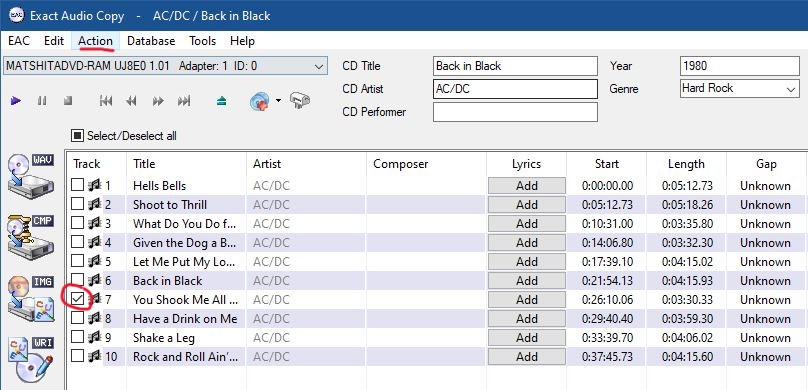
Action > Test & Copy Selected Tracks > Compressed
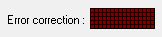
If you see the red dots are filled [image below], even EAC couldn't rip it successfully, and at this point its unfortunately time to start a separate section on your shelf for the CD's that are too far gone. :(
(From what I understand, one row is normal, more rows are fine, it only becomes an issue once it's totally filled. But don't hold me to that.)

Head over to your "! Fixes" folder, Ctrl+X the tracks, go to the folder generated by freac, delete the original error track, and Ctrl+V.
Now, the EAC track will most likely have a few differences from the rest of your freac ones, so open freac back up and head to Tags > Files and find the folder for your album. Locate the EAC files (the biggest giveaway is that they won't have album art), and edit all the data so that it matches the rest of the album. You can use the arrow keys to quickly move up and down to compare. This is also a fast way to paste in the data, as using the arrow key keeps the cursor in the same box and even highlights the text, so all you need to do is Down, Ctrl+V, repeat.
You can now move the CD into Pile 3!
PILE 3 - Cataloging
Head over to Discogs.
This wonderful website allows you to catalog the exact version of the CD you have.
💡 Pro Tip
It's also a great place to buy cheap CD's!Narrowing
Enter the artist and album in the search bar at the top and click on the Master Release for the album (the album cover with two white squares behind it).
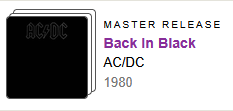
If the master release doesn't come up there, you can just click any release of it you see and then click "See all versions" in the top right.
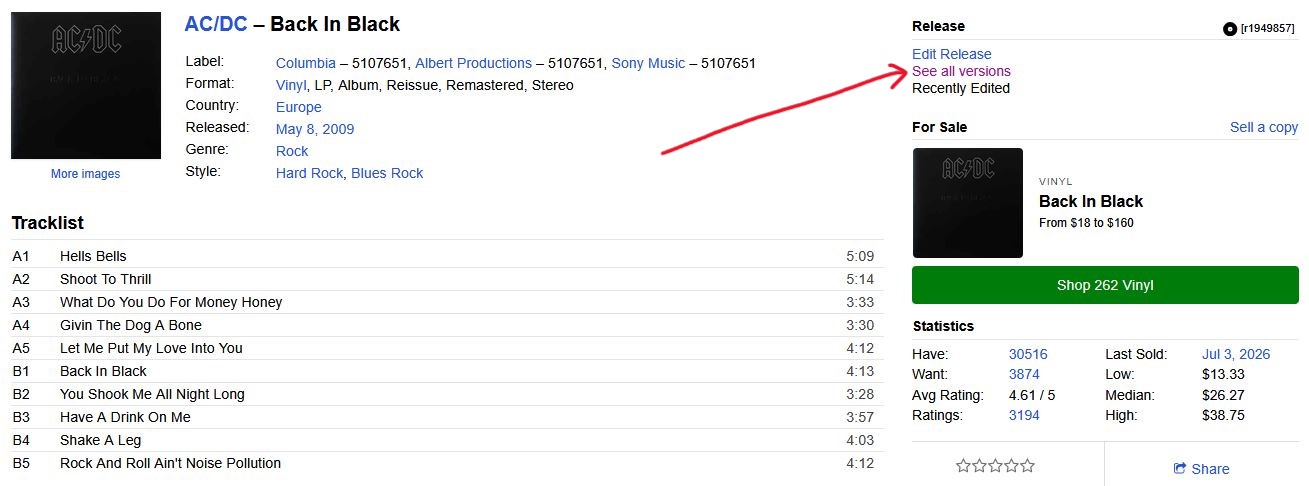
⚠️ Important Note:
If you get "No items found", you most likely made a typo. Discogs DOES NOT tolerate mistakes. If you have even one letter out of place, you will most likely not see your album.📝 Note
If you have a pretty niche album and there's no "See all versions", you're in luck! There's only one version of this album (at least cataloged on Discogs), so you can just hit "Add to collection" and move onto Pile 4!📝 Note
If you have a REALLY niche album and there's no entry at all, you'll need to Submit a Release.Chances are though, that you were able to find a master version. What you want to do now is scroll down until you see the "Versions" section. For "Format" select "CD", and for "Country", select your country (unless you know it's from a different country obviously).
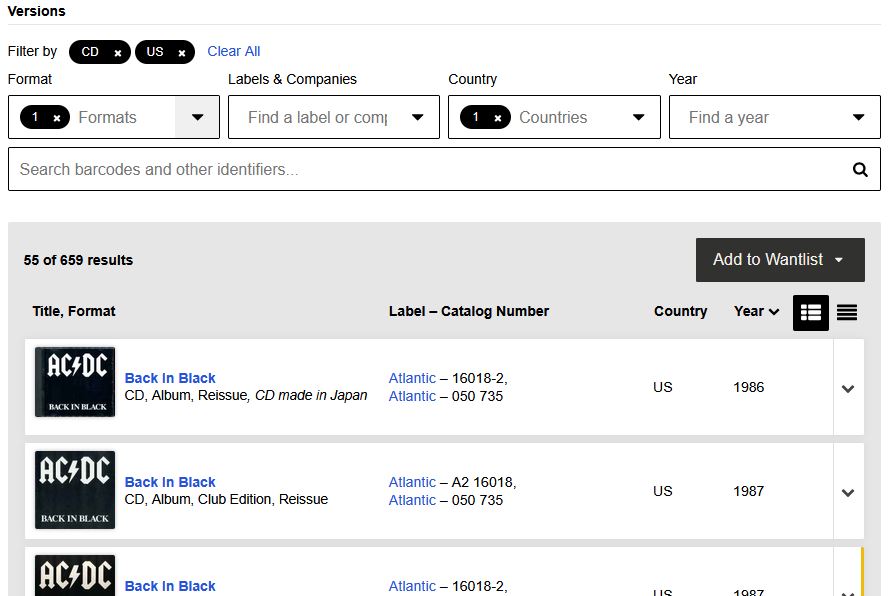
As you can see, we've narrowed it down from 659 versions to just 55. That's still wayyy too many to sift through though, so we're going to narrow it down a bit more. The goal is to get that number as low as possible, but ~10 or below is acceptable imo.
(If the CD and Country have already narrowed it to 10 or less, move onto Comparing)
📝 Note
You don't have to find the exact version of your CD if you don't plan on ever selling it or aren't OCD about cataloging everything with accuracy. If you want to just add whatever version you find first to your collection so you know you have it, go for it. Your collection value will be a bit off though if you care about that at all.
To further narrow it, I usually enter in something noteworthy from the back of the case, like the barcode, or something on the CD itself [picture below], like the "MADE IN USA BY PMDC" on the matrix of this example.
Try different things until you get a number your satisfied with checking, and then compare away. You'll get much better at knowing what to enter to narrow it down as you go.

That should have narrowed it down quite a bit. If it didn't, try a few different things. From here, I open each one in a different tab (clicking with your scroll wheel is a quick way to do this), and then comes the fun part... comparing.
Comparing
I first start with the images (Click on the album art to view them all). I'll go to each tab and start with the barcodes. This is usually the most obvious indicator of whether it matches your version.
Different barcode, different version. Close the tab.


Same barcode, but different barcode placement? Close the tab.

Then I'd check the front cover, look for any variations. Even just line breaks in some text, there are VERY minute details that differentiate versions. Next check the actual CD. Sometimes the disc face will be a different color or have different info. Yours should look EXACTLY the same as the one you find on Discogs.
Here are a few more examples of varying difficulties. (Click to enlarge)


Drowning Pool - Sinner (Back)
The text on the bottom left is aligned left on the first CD but centered on the second, the text is different, and the BMG logo is missing from the first CD.

Norah Jones - Come Away With Me
The Producer text for tracks 2, 4 & 13 is worded differently (look right above the barcode)

Bon Jovi - Slippery When Wet
The Label Code on the right CD (LC 0268)

Drowning Pool - Sinner (Disc)
The black splash is ever so slightly larger on the left CD. Look at it compared to the red text.You'll eventually reach a point where you've found your version, or narrowed it down to ones that look identical (or only have one image because the uploader was lazy)... but now it gets really tedious.
Scroll down to the "Barcode and Other Identifiers"
Here you'll take a look at the data side of the cd, right in that little ring in the center. This is what we call the "Matrix / Runout". Sometimes these will vary a lot, and other times it'll be one small detail that differentiates versions. If you really can't find any differences, check the "Notes" section right about this, that will sometimes explicitly say how a few versions that appear identical are different.
If you've found your version, you can now move the CD into Pile 4!
Submitting a Version
There is a not-unlikely chance that if you collect enough, you'll find a master release without your version, which you then have to add yourself (or just add the closest version if you don't want to deal with all of this).
The easiest way to do this is:
1. Find the closest version to yours
2. Hit "Edit Release" at the top right
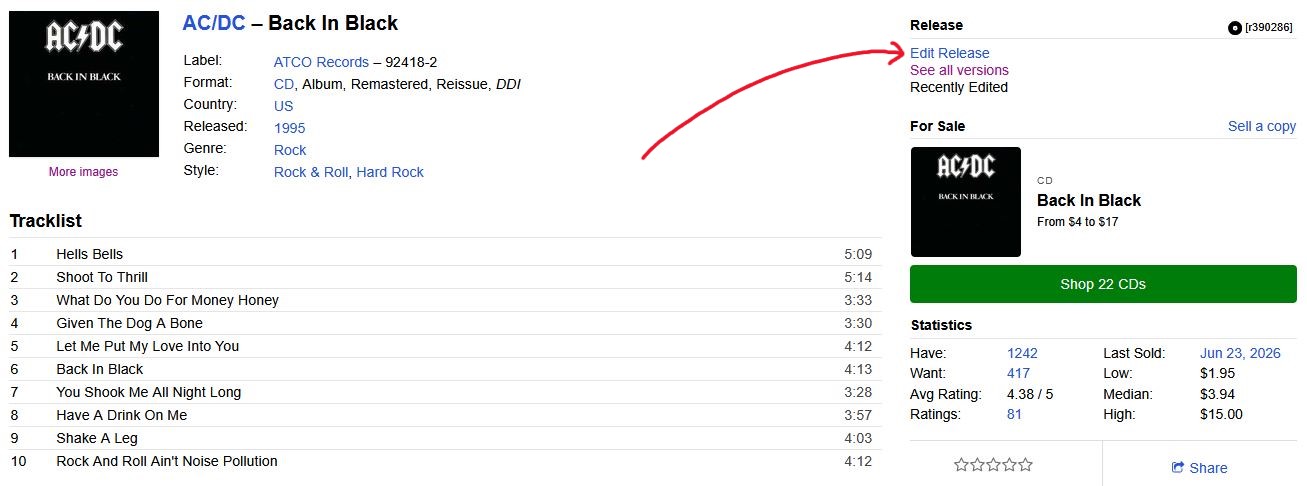
3. "Copy to Draft" to the right of the big text box

4. Click "Edit/Submit"
All you need to do here then is edit the info that differs from yours (mainly the "Barcodes and Other Identifiers"), and ideally upload some not-horrible pictures. For submission notes just type how it differs from other versions, and submit it! Then make sure to add the new version to your collection.
You should also add this to the Master Release of the CD. This is done by:
1. Copying the numbers at the beginning of the url after "release"

2. Going back to the Master Release and hitting "Edit Master Release"
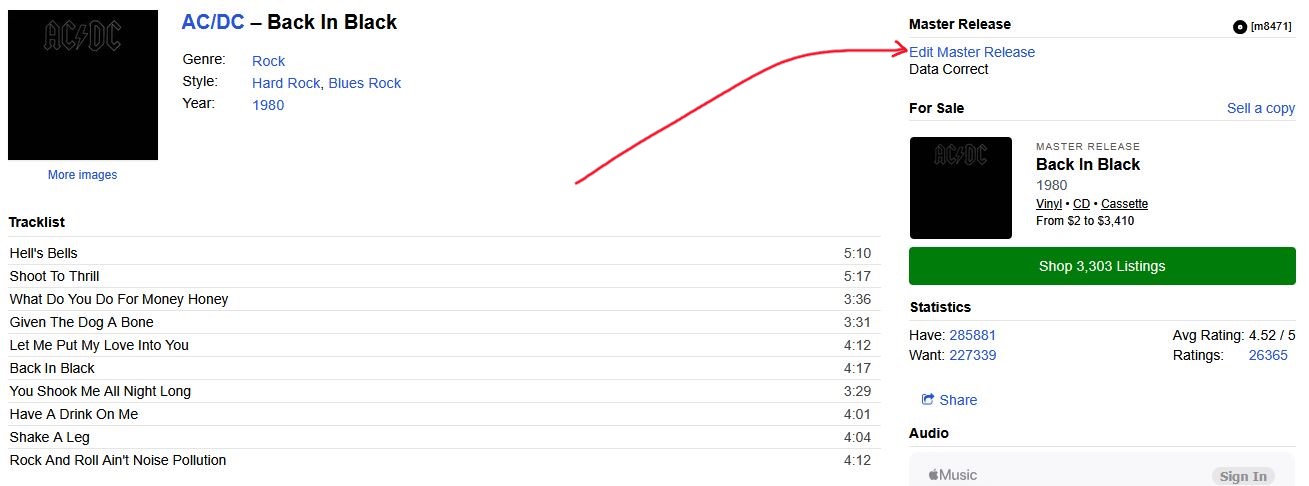
3. "Edit Master Release" again

4. Scrolling alllllll the way down in the "Releases" box, and pasting your version digits onto a new line. For submission notes just add like "Added new version".
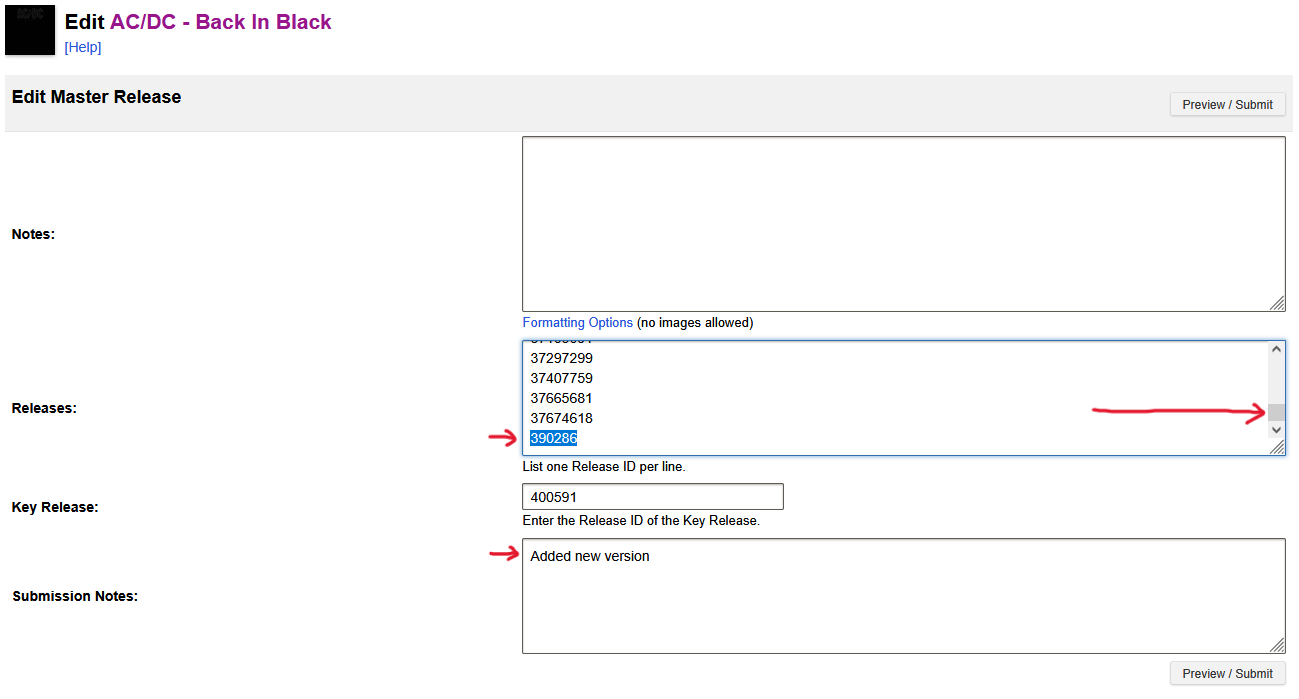
You can now move the CD into Pile 4!
Submitting a Release
If you get REALLY niche CD's like local bands or, like... nature soundscapes, chances are your CD won't have ANY release.
In this case, you'll have to submit a whole release yourself... :) good luck.
Just kidding, kid. Stick with me, and you'll get through this smoothly.
Alright, from the Discogs homepage, click on your account picture in the top right, and click "Submissions" under "Contribute".
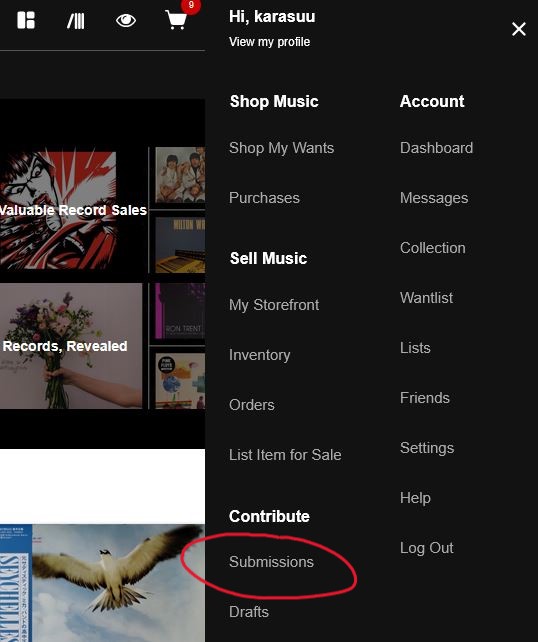
Now click the big, green "Add a Release" button in the top right.

Now this all might seem really intimidating, but don't worry. You only need to add the bare minimum to add a release, and let the pros fill in the rest later on.
The things you'll need to add are:
| Artist | Obvious | |
| Album Name | Obvious | |
| Label | Usually on the spine at the bottom if vertical, right if horizontal. Also on the back. | (image) |
| Catalog # | Usually on the spine at the top if holding vertical, left if horizontal. Also on the back. | (image) |
| Format | Obvious. CD. Make sure to add if it's a compilation, deluxe edition, club edition (has a weird looking bar code), etc. | |
| Tracklist | Obvious. Just make sure this matches YOUR CD. Different versions of a CD can have tracks in a different order, bonus tracks, etc. | |
| Genres | Honestly, it's best to just Google this. | |
| Submission Notes | "Added release" |
If you wanna be a good little boy/girl, the things you should add are:
| Images | Just snap some photos on your phone, these don't have to be perfect. Anything is better than nothing. Try to get a picture of the front, the back, and the CD face. Bonus points if you get the back of the CD ring and the booklet as well. | |
| Barcodes and Other Identifiers | 2 versions of the Barcode are ideal. One with the dashes & spaces, and one without.
You should also add the Matrix / Runout, which is printed on the backside of the inner CD ring. This is really important to differentiate versions. Note that these can look very different from CD to CD, but will always be in the same place. The SID Codes are also nice. These will both always start with "IFPI". Mastering will start with "L", Mould will just be whatever. Note that these can be in very different locations on the inner ring, and can sometimes be INCREDIBLY small or hidden. |
(Matrix)
(SIDs) |
| CD Case Type | This goes in the "Free Text" section under Format.
The 3 main types are: Jewel Case - The stereotypical plastic case. (You don't need to specify this kind) Digisleeve - Cardboard case with a sleeve that the disc slides into from the side. Digipak - A cardboard case with a plastic insert for the CD to snap into. |
(Jewel)
(Digisleeve) (Digipak) |
| Country | This info might be on the back, but if it's not don't sweat it. Just leave it blank if you can't find it. | |
| Release Year | Should be on the back. | |
| Credits | The band members are the most important, but you could also add the producer, mixer, and any other credits you find. These will usually be inside the booklet. |
Then just hit submit, and make sure to add it to your collection. And you're done!
You're officially a Discogs pro! You can now move the CD into Pile 4.
PILE 4 - The Shelf
That's it! You made it to the end. Pile 4 is just so that you don't have to run each individual CD over the shelf, you can move them in batches. Nice work! Here's a medal, you earned it.
